Regardless of your 3D printing experience or knowledge, issues are bound to arise. Troubleshooting and solving those common printing issues is one of the most important parts of the 3D printing journey. The team at InkSmith is definitely no stranger when it comes to printing quality issues and misprints. In an effort to help other fellow 3D printer users, we've put together this blog posts that covers some of the common printing quality issues and how to go about solving them.
1. Warping
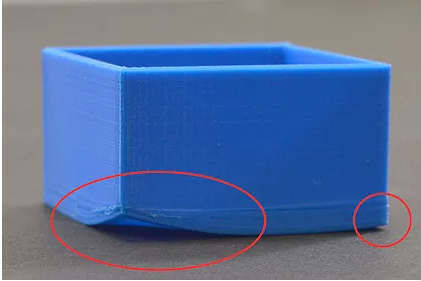
Warping occurs when the outer edges of the print curl up, this is often much more visible later in the print. The print will usually appear fine for the first few layers, but will gradually curl upwards as more layers are printed.

Cause
This is often due to the fact that plastic materials shrink when they cool. When filament is initially pushed out of the extruder, it’s heated to high temperatures (InkSmith PLA: 210℃, ABS-X: 240℃, PETG: 240℃) so that it can melt and print properly. This can be a problem especially for tall or wide parts. As each layer is printed, the material will deform a bit more until the outer corners of the part come apart from the heated bed.
Solution 'A'
Adjust the temperature settings of your heated bed according to the material with which you're printing. This will keep the bottom of your part hot and attached to the bed during the printing process. The recommended bed temperatures for different filament types will vary, be sure to check the filament packaging for exact temperatures. However, you may find that some adjustments need to be made depending on the colour with which you’re printing. Finding the exact right temperatures when using new filament for the first time will take some trial and error. If you're using an InkSmith 3D printer with InkSmith brand filament and need further assistance, contact our tech support team.

Solution 'B'
Use a brim on your print. A brim is a thin layer of filament material that extends past the edge of the printed object. This will help the outer edges adhere to the bed by increasing their surface area. After the print is finished, you can remove the brim by peeling it off or using an X-ACTO knife or scissors.

Solution 'C'
Decrease or eliminate fan cooling. Doing this allows layers to stay warmer and decreases your chances of warping. For some materials such as ABS, it’s recommended to disable fan cooling entirely. For Inksmith’s PETG it’s recommended to start the fan after 3 layers and keep it running at 70%. For Inksmith’s PLA it’s recommended to start the fan at the second layer and keep it running at 100%.

Solution 'D'
Change your material. Filament that requires a high extruder temperature to print (e.g., ABS) is more likely to warp. Even the colour of the filament can make a difference as it may have different dyes mixed into the material and affect its printing.
Solution 'E'
Decrease the infill. This will reduce the amount of material used. Therefore, less material will shrink and pull on the outer edges of the part.

2. Overhangs and Bridging Issues
An overhang is a feature that isn't supported from underneath and from 3 of its sides. The general rule for 3D printing is that any part that exceeds a 45˚ angle is considered an overhang.

Example of overhang issue on a test print (notice how the underside of the top of overhang isn't as smooth as it should be).
Bridging is when there is a feature that stretches across between 2 platforms but isn’t supported from underneath.

Cause
When printing an object with an overhang or bridge you may notice poor surface quality on the bottom side of the bridge or overhang. This occurs as a result of the 3D printer extruding essentially into thin air. Without supports, the extruded filament has nothing to stick to, and as a result, begins to droop.
Solution 'A'
Change the orientation of your part to avoid bridging or minimize the distance of the bridge or overhang. Note that in the examples given above of bridging, the shorter the bridge is, the less the feature droops.
Solution 'B'
Another solution for overhangs and bridging is to try lowering the printing speed so that the filament has time to attach itself to the vertical feature from which it’s being bridged or hung. This will give the filament time to harden in the correct position without sinking as much.
Solution 'C'
Use supports in your print. Supports are temporary structures printed with the 3D model. Supports can easily be added into your print during the slicing stage of your model. Supports will hold up the bridge or overhang while it’s being printed and then can be easily removed after the print is done.

3. Noticeable Step Lines on Angled Features

Cause
A Fused Deposition Modelling (FDM) 3D printer prints layer by layer starting at the base of the model and working its way up the Z-axis. Therefore, you may sometimes see the lines that make up these layers which can be especially prominent as “steps” on features with angles between 0° and 45°.
Solution 'A'
Decrease the layer height so that the layers are smaller and less noticeable. 0.2 mm is often standard withCubicon printers, but you may choose to print as low as 0.1 mm in the layer height. However, this will likely double your print time. On Cubicreator, you may also choose to reduce these rough surfaces by selecting the checkbox shown below.
4. Issues with Fine Details
Examples of fine details include thin lettering, thin tips at the end of narrow cones or pyramids, and sharp corners.

Cause
Because the detail is very thin and not too sturdy, especially when hot, it may get deformed when the extruder moves away from the thin feature.
Solution 'A'
Slow down your printing speed to get higher quality on finer details. This will allow those features to adhere better to their lower layer and cool down slightly before the extruder moves away. See the Overhangs and Bridging Issues section for how to change the speed in Cubicreator. If you have finer features closer to the top of your part, you can slow down the print only at the top to minimize your print time, but also be able to print the finer details at a higher quality (this slicing option is only available on the Simplify3D slicing software, not Cubicreator).
Solution 'B'
For issues with gaps in thin walls, you can adjust the Infill Overlap. This is how much the outer wall overlaps with the infill.
5. Stringing
Stringing is the unwanted extrusion between open spaces in the model. It often makes the part look “hairy”. An example of extreme stringing between and inside 2 parts that were printed in the same batch.

Cause
Because the filament is heated close to its melting point, it sometimes oozes slightly out of the nozzle even when it should not be extruding. When this happens and the extruder is moving across an open space, stringing occurs.
Solution 'A'
Increase the retraction distance by 0.2 - 0.5 mm until you’re happy with the results. You may even increase it up to 4 mm depending on the severity of the stringing. However, be careful when increasing the retraction as it may cause some unwanted lines to appear on the body of your 3D printed part due to a lack of filament when the extruder begins to print after it has retracted.
If all else fails, you could always cut off the strings and unwanted material using scissors or a knife. Some materials, such as ABS, can also be sanded down to give the part a nicer finish.

Something we missed?
For any additional printing quality issues, check out Simplify3D's Troubleshooting page: https://www.simplify3d.com/support/print-quality-troubleshooting/
Even though you may not have a Simplify3D slicer, most of their recommended solutions are universal to all slicers.
Dylan's Experience with 3D Printing
New Year, New Technology